Set up Holdback, step by step
Last checked 4 November 2026. Screen names were updated on 2 November 2026 for the new admin (Today, Rentals, Charges, Settings); the screenshots still show the earlier screens. This is the slow, careful version: every click, what to type, and what you should see before you move on. If you'd rather read the whole thing as a reference, Getting started is the short one and the Holdback guide is every screen and setting. If you get stuck, email support@holdback.co.uk: there's a person at the other end.
You don't need to have used a Shopify app before. Each step has the same shape: where to click, what to type or choose, and Check it worked: a line that says what you should see. If you don't see it, stop and read the troubleshooting at the end before going on.
Part 0. Before you start (5 minutes)
How long it takes. About 30 minutes the first time, including a test order. The first six steps (install, plan, theme, first deposit) take about 15.
What you need.
- A Shopify store with a supported payment provider. Holdback works with Shopify Payments, and PayPal Express with subscriptions on. On Adyen on Shopify or Stripe, email us first. Local payment methods can't be used for a deposit on the card. Your provider must be able to save a card.
- Your hires sold as Shopify products, through the Online Store. Holdback works at online checkout. Each thing you hire out is a product (or a variant) with a price. That price is your hire fee: what the customer pays today. Holdback adds the deposit on top.
- An Online Store 2.0 theme. Dawn, Horizon, Prestige and Impulse have all been checked. An older theme, from before Online Store 2.0, may not have App embeds in the theme editor, and Holdback needs them.
- An email inbox you can read, to be the "customer" in your test order.
- If you use a booking app (Cowlendar or Book That App), have it installed already. Holdback works beside it.
- A development store, if you'd like to test without any real money. It's free from the Shopify Partner Dashboard. We use one for every test in this guide. Step 11 explains the other way.
What Holdback doesn't do. It doesn't work for hires sold in person on Shopify POS (Shopify POS doesn't save a card for a deposit; see Selling in person), and local payment methods such as Klarna or iDEAL aren't offered on a product with a deposit. Your customer pays by card, or a wallet such as Shop Pay, Apple Pay or Google Pay.
Check it worked: you can say yes to these three. Is Shopify Payments, or PayPal Express with subscriptions on, switched on? Is each hire a product on your Online Store? Do you have a theme with App embeds?
Part 1. Install Holdback
Step 1. Install from the App Store
- In your Shopify admin, open Apps in the left menu, then Shopify App Store. Or go straight to the Holdback page on the App Store.
- Search for Holdback. Open it. Press Add app.
- Shopify shows an access screen. It lists what Holdback is asking to see and change. In plain words: your orders (to open a deposit from each hire, and to finish it), your products (to add the deposit to the ones you choose), and your customers' names and email addresses (to say who a deposit belongs to and to email them when anything happens). Holdback does not see card numbers. Read it, then press Install at the bottom of that screen. (Shopify moves its own buttons about from time to time. It is the one that agrees to installing.)
- If Shopify asks for more access later, such as "all orders" so Holdback can finish hires booked more than 60 days ahead, press the button that approves it. Without it, Holdback refuses to touch an order older than 60 days, and tells you so.
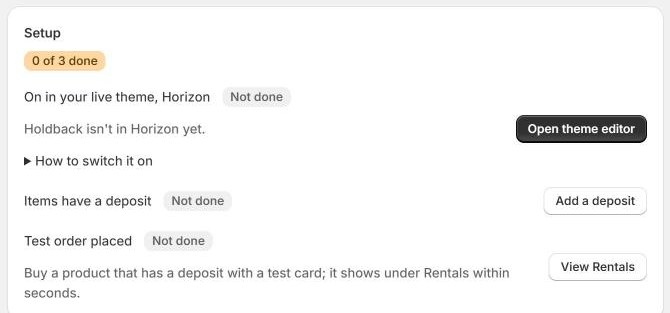
Check it worked: Holdback opens inside your Shopify admin on its Today page. A Setup card shows how many steps are done ("Setup · 0 of 3 done").
Step 2. Accept Holdback's terms
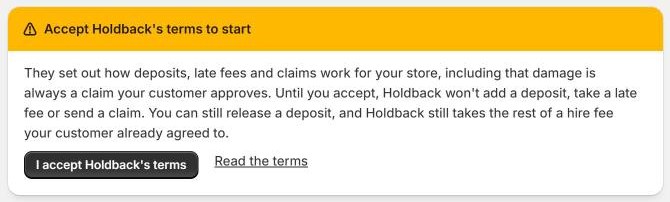
A banner at the top of Today asks you to accept Holdback's terms before you can add a deposit, charge or send a claim.
- Press Read the terms to read them. They're also at app.holdback.co.uk/terms.
- Press I accept Holdback's terms.
Check it worked: the banner goes away. If you don't see it, you've already accepted.
Step 3. Choose a plan
Every plan has every feature. They differ only in how many deposits a month they cover.
| Plan | Price | Deposits a month |
|---|---|---|
| Free | Free | 5 |
| Standard | $34 a month, 14-day free trial | 50 |
| Pro | $69 a month | 200 |
| Scale | $129 a month | Unlimited |
Paid plans can be billed yearly at 10 months' price. A yearly plan's deposits are one allowance counted across the year: Standard 600, Pro 2,400. Shopify adds Holdback to your Shopify bill, in US dollars.
- On Today, press See plans (top right).
- Shopify's plan page opens. Choose Free to begin, or Standard to start the 14-day trial. Press the button under the plan you choose and confirm.
- You can change it whenever you like from the same button. Going over your plan's count does not stop anything: Holdback keeps recording every deposit and you can finish them all, but a banner asks you to upgrade.
Check it worked: back on Today, the quiet line under the date names your plan and the count, for example "Free · 0 of 5 deposits this month".
Part 2. Set Holdback up
Step 4. Find your way round Holdback
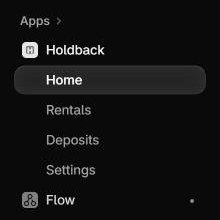
Holdback has four pages, in the left menu under Holdback: Today, Rentals, Charges and Settings.
- Today: what needs you today, your setup checklist, and money this month.
- Rentals: every hire, with what to do next on each.
- Charges: which products carry a deposit, and how; the late-return rate, the damage guide prices and the damage waiver.
- Settings: customer emails, reminders, cancellations, the deposit check at checkout, selling in person, local delivery for hires, and your plan.
Until setup is finished, the Setup card on Today is the first thing you see. It has three steps, with a button for each: Open theme editor, Add a deposit, and View Rentals (for your test order).
Check it worked: you can see Today, Rentals, Charges and Settings under Holdback in the left menu.
Step 5. Turn on the Holdback block in your theme
This is what puts the deposit notice on your product pages and adds the deposit to the cart. Without it, your product pages show no deposit notice and no deposit reaches checkout.
- On Today, in the Setup card, press Open theme editor.
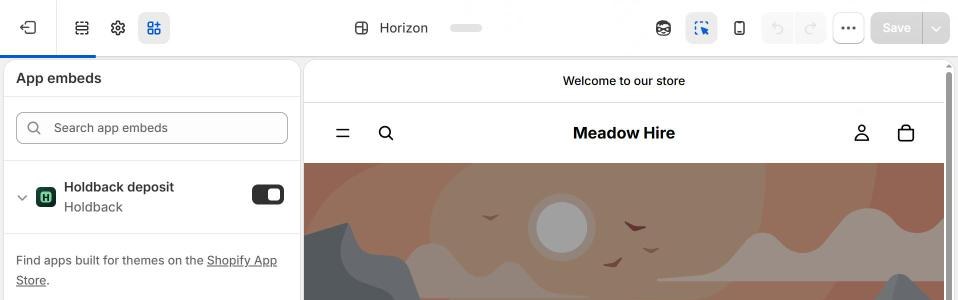
- Your theme editor opens. In the sidebar on the left is App embeds, with Holdback deposit on it, already switched on. If the sidebar isn't showing, press the icon of a small grid of squares on the far left.
- Press Save at the top right of the editor.
You can switch the block off with the same toggle whenever you like. Holdback does not write to your theme's code, so switching it off leaves no trace.
Check it worked: the Holdback deposit toggle is on and Save has gone grey. Back on Today, the Setup card says "Setup · 1 of 3 done".

Step 6. Add your first deposit
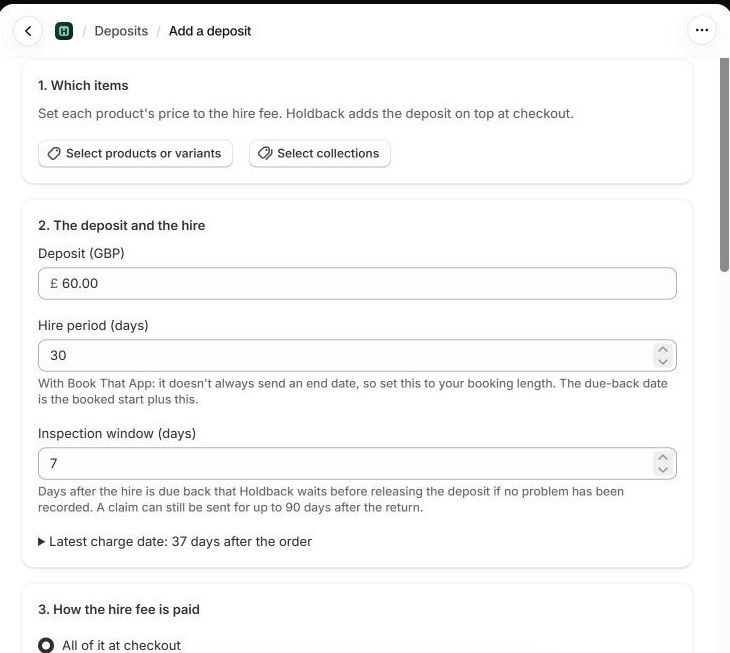
Set each product's price in Shopify to the hire fee, what the customer pays today. Holdback adds the deposit on top at checkout. In this example the camera kit is £40 a hire and the deposit is £60.
- In the left menu, open Charges. In the Deposits section, press Add a deposit.
- The page has four numbered steps and, on the right, At checkout, which works out what your customer will see as you type.
1. Which items. Press Select products or variants and tick the products to carry a deposit, or only some variants of one. (Variants you leave out are not available to buy online, because Shopify requires a purchase option on the whole product; the page warns you.) Or press Select collections to pick every product in a collection. Your picks appear in a grey box.
2. The deposit and the hire.
| Field | What to type | Example |
|---|---|---|
| Deposit (GBP) | The most you can ever charge for this hire: your store's own currency. | 60 |
| Hire period (days) | How long the hire lasts, 1 to 365. It sets the due-back date. | 3 |
| Inspection window (days) | How long you need after it comes back to check it over, 0 to 365. | 2 |
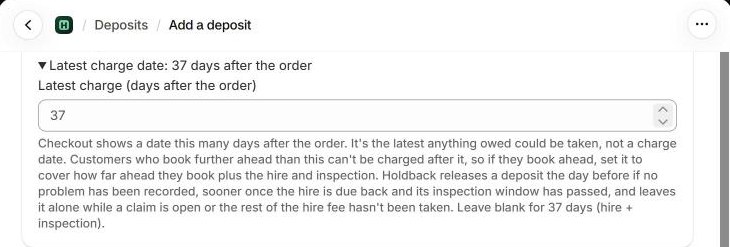
Underneath, a closed section reads Latest charge date: N days after the order. Leave it. It's the date Shopify prints at checkout. Step 8 explains it.
3. How the hire fee is paid. Choose All of it at checkout. That's the usual one: the customer pays the whole hire fee today. The other choice is for a particular case: One deposit per booking (Cowlendar). See Step 19.
4. Late fee (optional). Step 7.
- Press Apply deposit.
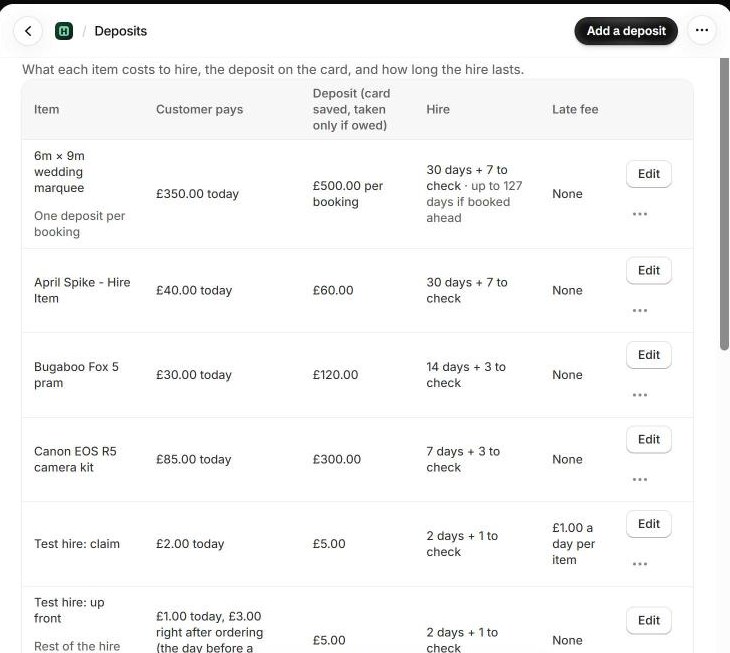
Check it worked: a green message says how many items the deposit was applied to, and you're back on Charges, with a line for your camera kit: its hire fee, a deposit of £60.00, Hire "3 days + 2 to check", and the late fee. If anything couldn't be applied, a red box lists each item and why, and none of them is changed.
Step 7. Set a late fee
A late fee is optional, and it's agreed with your customer at checkout. It's what each day late costs, per item. Holdback keeps it through Keep a late fee for eligible late days, whether the item is still out or back, limited to the remaining deposit. Recording a return does not take it.
You can set it three ways, and the most specific one wins:
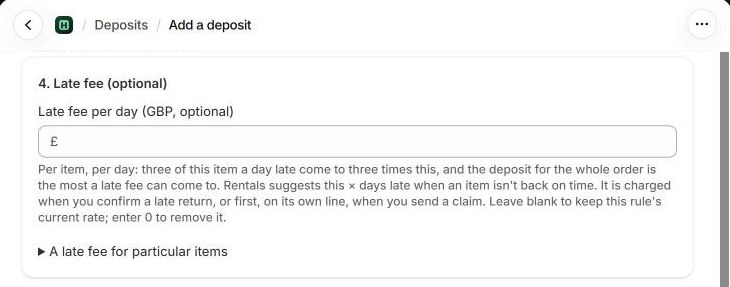
- On one deposit, in step 4 of Add a deposit: Late fee per day (GBP, optional). Type 15 for £15 a day. Leave it blank to keep the rate the rule already has; type 0 to remove it.
- For particular items: open the closed section A late fee for particular items, pick the items in step 1, type the rate under Late fee per day for the picked items, and press Set on N picked items.
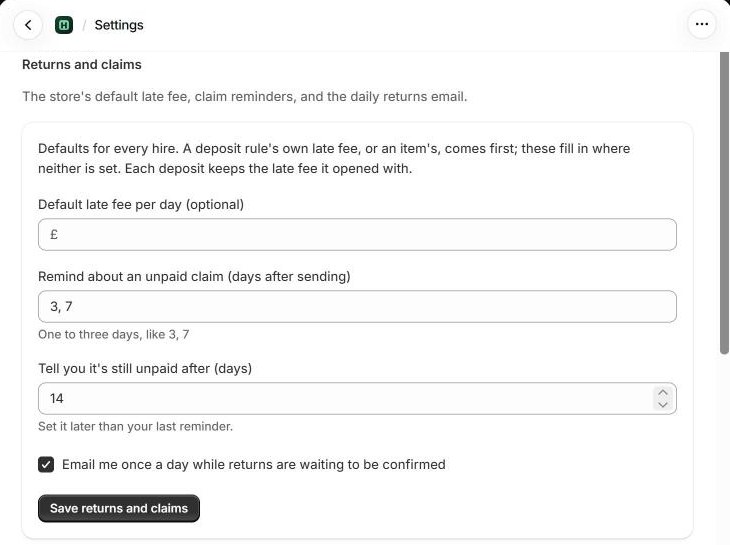
- For the whole store: Settings → Reminders → Default late fee per day (optional), then Save reminders.
Check it worked: on Charges the line for your item says "£15.00 a day" under Late fee. The product page (Step 12) states the daily rate to your customer.
Step 8. Hire length and days to check
Two numbers do most of the work.
- Hire period (days) is how long the hire lasts. Rentals shows the item as due back this many days after the order. If your booking app gives a booked end date, that date is used instead.
- Inspection window (days) is how long you need after it comes back to look it over.
Add them together and you get the latest charge date: for a 3-day hire with 2 days to check, 5 days after the order. Shopify prints that date at checkout and says the customer's card "will be charged" on it. That's Shopify's own wording and it is not Holdback's to change. It is the last date anything could be taken, and applies if something is owed. Holdback's product notice explains this to your customer before they pay.
Two things to remember:
- Finish every hire before that date. After it, Holdback does not take anything; it can release.
- If customers book weeks ahead, the date counts from the order, not from the hire. Open Latest charge date on Add a deposit and make it cover how far ahead they book, plus the hire and the inspection. Long hires and booked dates has the detail.
Check it worked: on Charges, the Hire length column reads like "3 days + 2 to check".
Step 9. The damage waiver (optional)
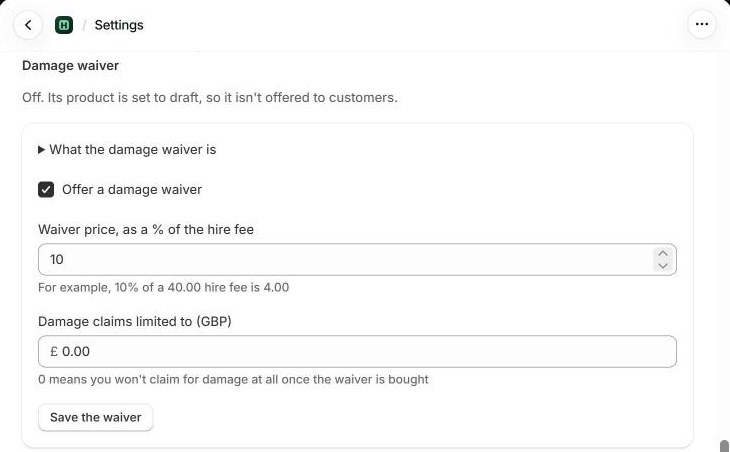
A waiver is a small extra charge your customer ticks on the product page. In return, you agree to limit what you claim from them for accidental damage. It's a promise from your store, not insurance. Skip this step if you don't want one.
- Open Charges. Under Damage waiver, press Turn on.
- Tick Offer a damage waiver.
- Waiver price, as a % of the hire fee: for example 10, so a £40 hire gets a £4 waiver.
- Damage claims limited to (GBP): the most you'll claim for damage once it's bought. 0 means no damage claims.
- Press Save the waiver.
- Holdback creates a product called Damage waiver. Open it from the message that appears, and under Sales channels make sure Online Store is on. Until you do, customers aren't offered it. A banner reminds you.
Check it worked: the product page of a deposit item now has a second tick box offering the waiver with its price. More in Offering a damage waiver.
Step 10. Customer emails and the sender
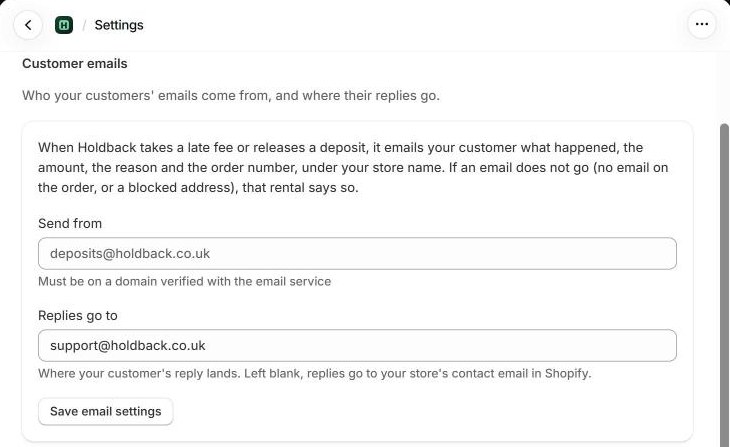
Whenever a fee is taken or a deposit is released, your customer is emailed what happened, the amount, the reason and the order number, under your store's name. You set who it comes from.
- Open Settings, then Customer emails:
- Send from: the address emails come from. It has to be on a domain verified with Holdback's email service. Leave it blank to use Holdback's own sending address. That's fine to begin with.
- Replies go to: where your customer's reply lands. Blank means your store's contact email in Shopify. Use your own address if you'd rather answer them yourself.
- Press Save email settings.
- If you see a banner headed "Email sending is not switched on yet", Holdback is not able to send yet; tell us at support@holdback.co.uk.
If an order has no customer email, or that address bounced, no email goes, and the rental says so.
Check it worked: the fields show what you typed after Save email settings. You'll see the real email arrive in Step 11.
Part 3. Test it
Step 11. Place a test order
Do this once before real customers do. Test with a test card, not a real customer's.
The safe way: a development store. A development store only takes test payments and no real money moves. Install Holdback on it exactly as in Steps 1 to 10. Then:
- Make sure one product has a deposit (Step 6) and Track quantity is off for it, or it has stock. (A new product tracks stock from 0, which makes the storefront show Sold out with no Add to cart button.)
- Open the storefront. A development store's storefront asks for its password (in Online Store → Preferences).
- Open the product. Under the buy buttons you'll see the Holdback box (Step 12). Tick I agree to the deposit terms. and press Add to cart.
- Check out. Use your own email address for the customer. Pay with the test card 4242 4242 4242 4242, any future expiry, any security code, any name.
If your store is already live: you can test without a development store by switching Shopify Payments to test mode (Settings → Payments → Shopify Payments → Manage → Test mode). While it's on, no real customer can pay, so do it at a quiet time and turn it off straight after. We don't recommend trying to test with a discount code that takes the hire fee to zero: with no hire fee to pay today we haven't proved that Shopify saves a card, so it wouldn't prove the deposit works.
Check it worked:
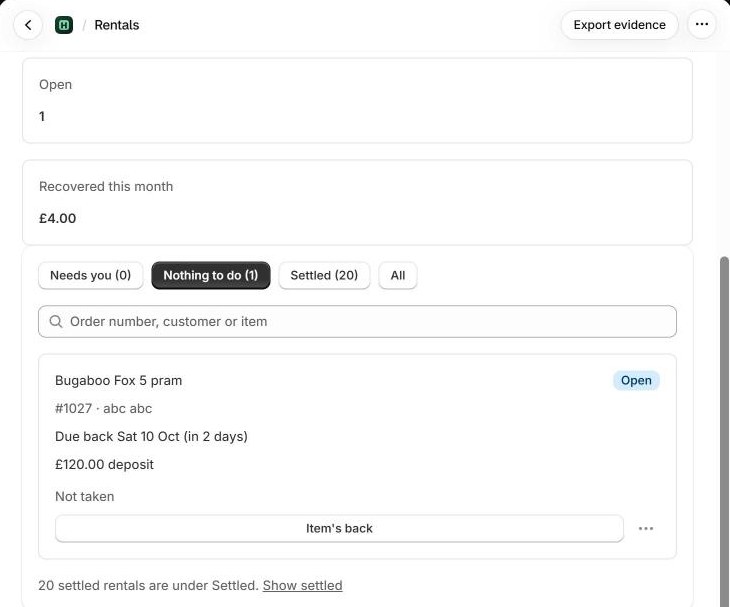
- Checkout showed Due today as your hire fee, the full price struck through, and the deposit as a later balance with a date.
- Within about 10 seconds, Rentals lists the order as Out on hire, with your customer, the order number, the item, the due-back date and the deposit.
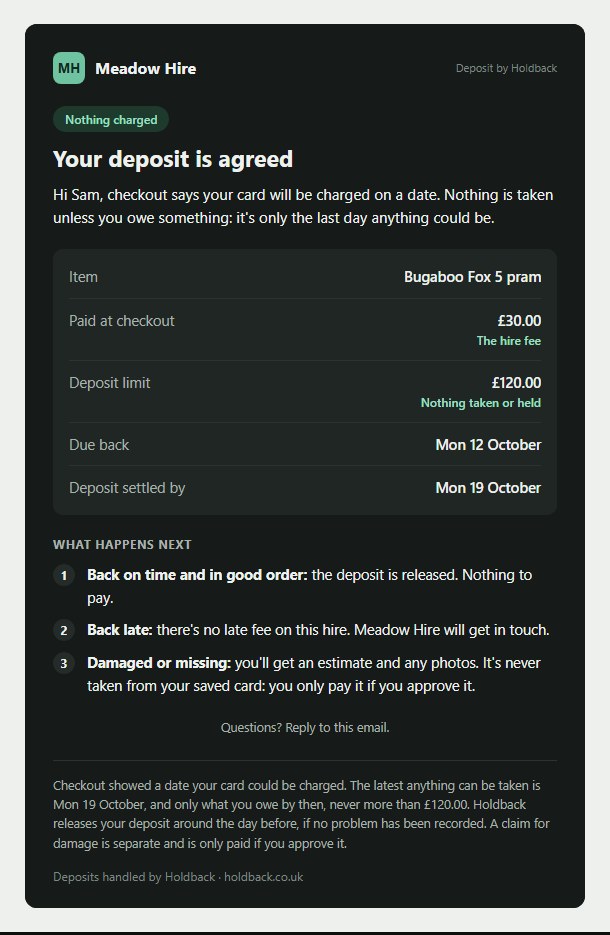
- You got an email titled "Your deposit for #… is saved: nothing taken".
- In Shopify's own order page, the order reads Partially paid. That's correct: the balance is the deposit.
- On Today, the Setup card says "Setup · all 3 done".
The email your customer gets when the deposit is saved (shown here with made-up names):
Step 12. What your customer sees
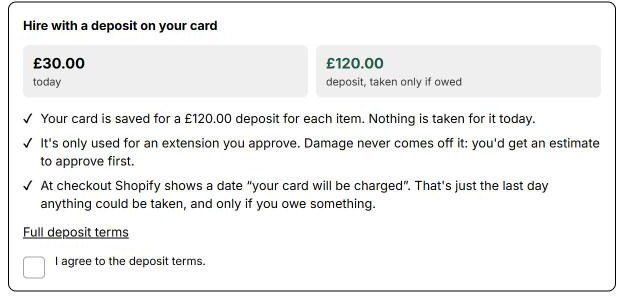
On the product page, a box beside Add to cart, headed Hire with a deposit on your card. It shows the hire fee today and the deposit, three short points, and Full deposit terms, which opens the notice in full: what the date at checkout means, what Shopify's wording means, that their card is saved for this hire, and how to cancel. Under it is the tick box I agree to the deposit terms. Add to cart waits until it's ticked, and Buy it now is hidden until it is. Holdback keeps the exact words and the moment they ticked. A non-return can be kept from the card only for a customer who ticked it, so a customer who didn't tick is a claim instead.
At checkout, Shopify's own page: the hire fee due today, the full price struck through, the deposit as a later balance, and a date. Words like "Your card will be charged on …" are Shopify's and not Holdback's to change. The product page explains them first.
By email, minutes after ordering: what the deposit is and that it hasn't been taken, when the hire is due back, and a link to a page showing where it stands. On hires longer than two days they get a reminder two days before it's due back.
On their deposit page (the link in the email), they see the amounts, any fee and your reason and, while it can still be cancelled online, Cancel this hire (Ask to cancel for collected and locally delivered hires). Shipped hires with no booked start can be cancelled until fulfilled and no later than due-back or 30 days after the order, whichever is sooner. After the online window closes they can ask to cancel only before due-back; afterward they contact you. Earlier agreements keep their existing cancellation terms. They can also say they've seen your handover photos, or request Shopify's secure link to change their saved card while their deposit is open.
Everything the customer reads can be reworded in the theme editor: App embeds → Holdback deposit. Leave a text box blank to keep Holdback's own words.
Check it worked: you've seen the box, ticked it, and read the email.
Part 4. Running a hire
Step 13. When it comes back fine
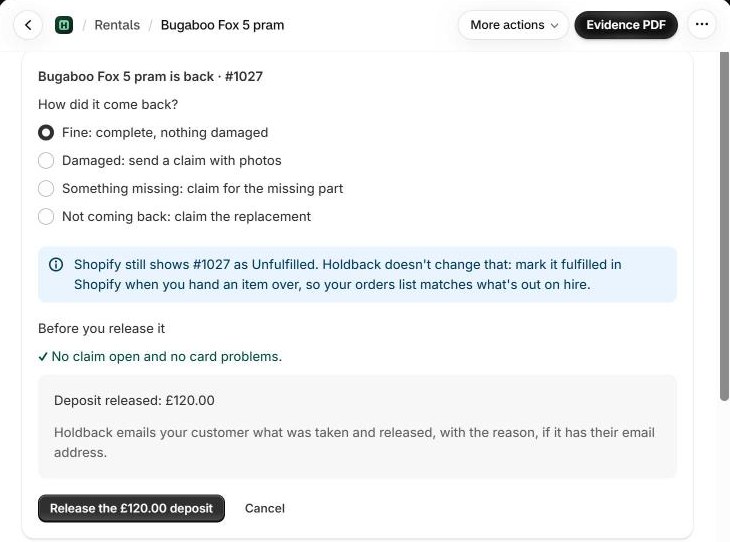
- Open Rentals. Find the hire and open it. Press It's back (on the rental's own page, or on its card under Overdue on Today).
- The page asks "All OK?". It lists anything still owed, or shows a green tick if there is none.
- Press Yes, all fine · release £60.00.
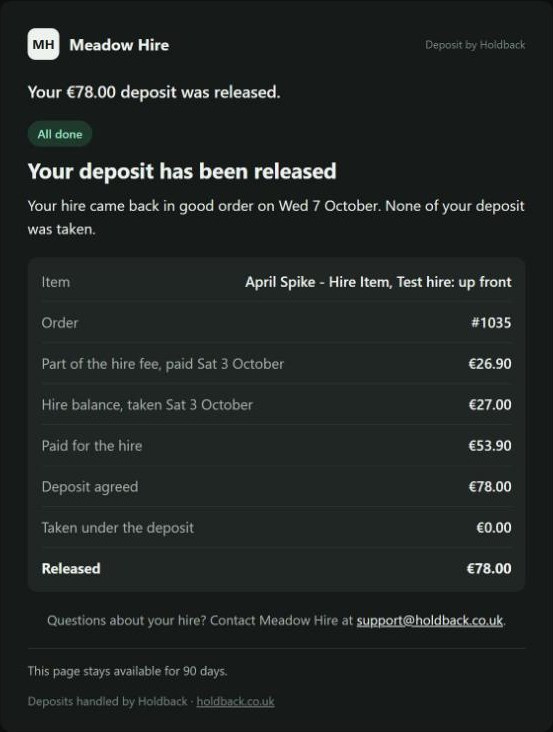
Your customer gets one email saying the deposit is released.
You don't have to do this for every hire: if no problem has been recorded, Holdback releases a deposit by itself the day before the latest charge date (and emails you the day before), whether or not you have pressed It's back. Pressing It's back is for when you know it's back.
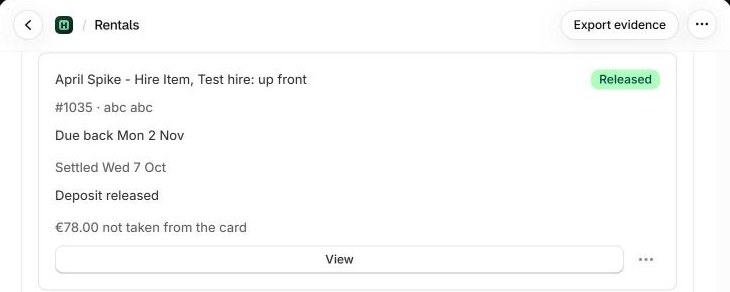
Check it worked: the rental's badge says Released, and "Customer emailed" shows under it.
Step 14. Keeping late days
- Open Rentals and the overdue hire. Under Take money, choose Keep a late fee.
- Choose the whole days to keep. With a £15 daily rate, two eligible days come to £30, capped by what remains. Days already paid for are excluded.
- Read the amount and confirmation, then confirm the keep. There is no free amount or customer-facing reason to type. Holdback must be able to email the customer before money moves.
- When the item comes back, use It's back to record it. Recording an overdue return does not take money. Release the deposit separately when appropriate.
Without a usable saved card, an eligible fee goes by payment link. Never use Shopify's Collect payment to bypass the amount and agreement checks.
Check it worked: the rental shows the amount kept and the customer email. The remaining deposit and return record are separate.
Step 15. When it comes back damaged, or doesn't come back
Damage is never taken from the saved card. Loss and non-return can be kept only under an eligible new agreement; earlier hires use a claim. A claim is: your estimate and photos, which your customer approves and pays themselves on Shopify's own payment page.
Take photos on every hire, when it goes out and comes back. On the rental's page, under More, press Photos and evidence. The Evidence panel opens with Add a handover photo and Add a return photo; press the one you want and choose a picture from your phone's camera or library. Your customer sees the handover photos on their deposit page.
To send a claim:
- Open Rentals, find the hire, press It's back, then No, there's a problem, and choose Something's damaged, A part is missing or It's not coming back. (Or, on the rental, press Send a damage claim under Take money.)
- What does it cost? List the estimate line by line (what, and how much). It is limited to what's left of the deposit.
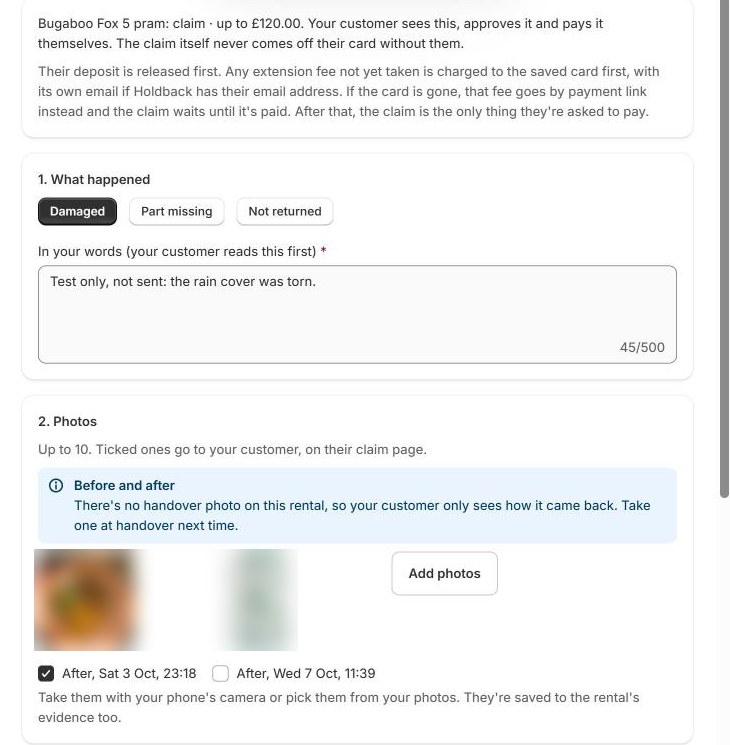
- Photos and a note. Say what happened. Tick the photos to send, or press Add photos to add more.
- Check and send. Press Send claim for £X.
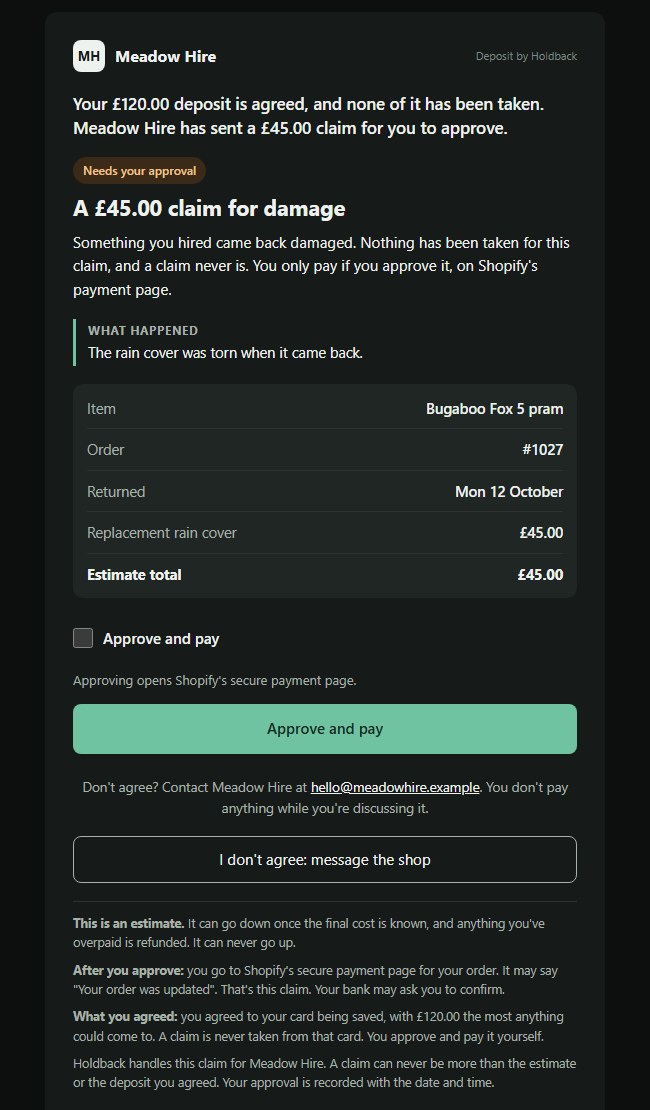
Holdback releases the deposit, adds your estimate to the customer's order, and emails them the estimate with a link to a claim page that shows your photos. There they tick I approve this claim and press Approve and pay, which takes them to Shopify's own payment page. Or they press I don't agree and write to you; their message is on the rental and in your inbox, and Holdback stops reminding them until you answer. If the repair costs less than your estimate, you refund the difference from the claim. While it's open, do not press Collect payment on the order. Damage, loss and non-return has every step.
Check it worked: the rental shows Claim sent, waiting for your customer. Your customer's email arrives with the link.
What your customer sees when they open the link (made-up names): the claim, the photos you ticked, and Approve and pay.
Step 16. Releasing, in the cases that aren't "it came back fine"
- The customer cancels before the hire, from their deposit page, until your cut-off: Holdback releases the deposit first, then cancels the order and refunds them under your cancellation setting, and you’re emailed. After the cut-off they contact you. If you cancel an order in Shopify's own admin while a deposit is still open, the customer's card stays attached to the order, so release the deposit in Holdback first, or use Booking cancelled (Rentals, the rental, More).
- A card was declined: the rental shows Charge not completed. Press Ask for a new card; Shopify emails them a secure link and you do not see card details. When they've updated it, the rental says "Card updated" and Resume returns.
- A charge isn't going to go through: press Give up and release, then Give up and release the deposit. The charge is removed from the order, the deposit is released, and your customer is told.
Check it worked: the rental's badge changes to Released (or shows what was taken).
Step 17. Cancelling a booking
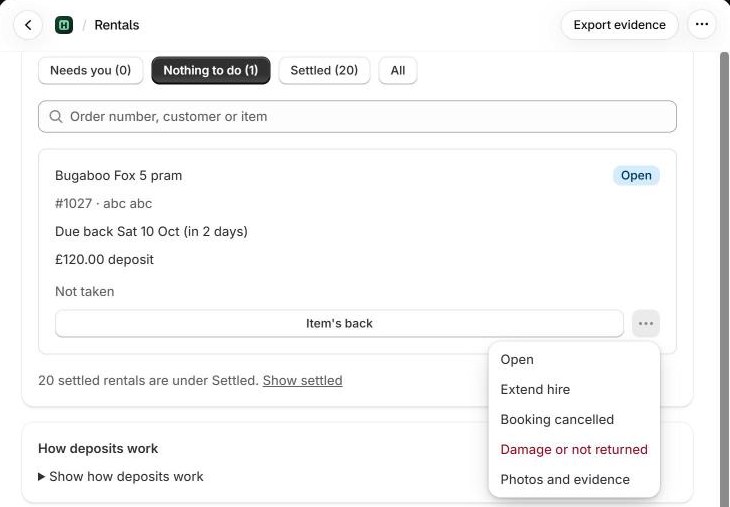
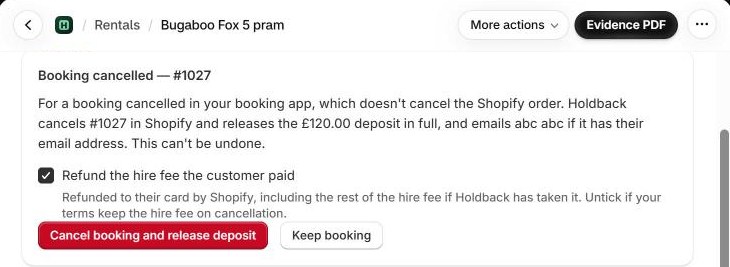
- From Holdback: on the rental, open More → Booking cancelled. Refund the hire fee the customer paid is ticked; untick it if your terms keep the hire fee. Press Cancel booking and release deposit, or Keep booking. This cancels the Shopify order and is final. Use it when a booking app cancels a booking but leaves the order standing.
- From Shopify: cancelling the order releases its deposit by itself.
- The customer cancels: Cancel this hire on their deposit page releases the deposit first, cancels the order and refunds under the cancellation terms recorded at checkout, with no action from you; you get a copy by email and the rental shows Order cancelled. For a collected or locally delivered hire they get Ask to cancel instead, which puts the request on Today under Customer asked to cancel.
Mark orders as fulfilled when you send them: a customer can cancel online until you do.
Check it worked: the rental says the deposit was released, and the Shopify order shows cancelled.
Step 18. Hires past their due-back date
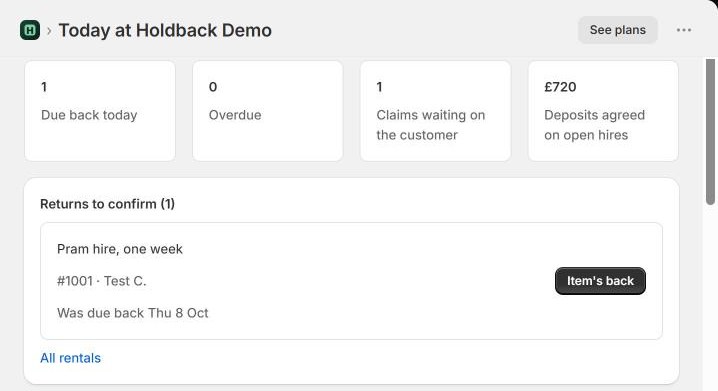
Hires past their due-back date are listed on Today under Overdue, and under the Overdue filter on Rentals, until you say what came back. Each has the button It's back, which opens the same check as above.
- Recording the return takes no late fee. Use Keep a late fee separately for eligible late days.
- You get one email a day while any are waiting (switch it off under Settings → Reminders: Email me once a day while returns are waiting to be confirmed).
- Under the list, Everything else counts what's due back today, what's out on hire, what's booked and not started, and claims waiting on your customer, and Money this month shows the deposits agreed on hires still out.
Check it worked: a hire past its date appears under Overdue on Today; when no hire is late, Today says so.
Part 5. Booking apps, and leaving
Step 19. Working with Cowlendar or Book That App
Holdback works beside both, and Today names them when it finds them on your theme. In each, the booking apps add their own Book button; Holdback adds the deposit to the booking and shows the booked dates on the rental.
- Do Steps 1 to 10 first.
- In Add a deposit, choose how the hire fee is paid: One deposit per booking (Cowlendar) puts one deposit on a whole booking (3 days of 2 items is 6 units, one deposit).
- Place one test booking on a product with a deposit, and check it appears on Rentals with its dates, before taking real bookings.
- Cancelling a booking in the booking app does not cancel the Shopify order: use Booking cancelled (Step 17).
Full details: Using Holdback with Cowlendar and Using Holdback with Book That App.
Check it worked: the test booking's rental shows the booked dates ("Booked … to …").
Step 20. Uninstalling
Finish every rental first. If you uninstall Holdback, your hire products can be bought without a deposit until you reinstall or remove them. Holdback emails you an export of every open hire when you uninstall, and deletes your data 48 hours after you uninstall. Save the export.
- Open Rentals and finish every one that's open: It's back, or release it.
- Download the Evidence PDF for anything you may need (under More on a rental).
- In Shopify, open Settings → Apps and sales channels, find Holdback, and press Uninstall.
- Save the export of open hires attached to the uninstall email. You can reinstall within 48 hours and Holdback puts your rules back as they were.
Check it worked: Holdback no longer appears in your apps.
Troubleshooting
The deposit notice isn't showing on my product page. Three things, in this order. 1) The theme block isn't saved: do Step 5 again and check Holdback deposit is on under App embeds, and Save. 2) The product has no deposit yet: check it appears on Charges. 3) The product isn't on your Online Store: open it in Shopify and turn on Online Store under Sales channels. Today also names products that customers don't see.
The red payments banner: "This store can't offer deposits at checkout yet". Holdback does not see a payment provider that can save a card for later. Switch on Shopify Payments (Settings → Payments), or PayPal Express with subscriptions. On Adyen on Shopify or Stripe, email us.
A customer says they weren't charged. That's usually right. The deposit is agreed at checkout and taken only if something is owed under the agreement: eligible late days or non-return, or a claim they approve. Extension fees use a separate payment link. Their emails and their deposit page say so. If a late fee or claim was due and they weren't charged, find the rental and look at What happened.
A late fee failed. The rental says Charge not completed with the reason. If the card was declined, press Ask for a new card, and press Resume once they have. If Shopify no longer has their card on the order, Holdback releases the deposit and emails them a payment link for the fee. If Holdback refused, the page on refused fees lists every refusal.
A claim hasn't been paid. Your customer is reminded 3 and 7 days after you send it, and you're emailed at 14 days (change the days under Settings → Reminders). If they pressed I don't agree, read their message and lower the claim, or withdraw it. On the claim, Check for payment, Withdraw the claim and Write it off are there.
Klarna, iDEAL or another local payment method isn't offered on a deposit product. That's by design: they don't save a card for later. Your customer pays by card or a wallet.
Customers who walk in. Holdback works at online checkout only. A hire sold in person on Shopify POS has no saved card; those sales are listed on Rentals under Sold without a deposit, so you can take a deposit another way, such as a card pre-authorisation on your terminal. See Selling in person.
Where to go next
- Getting started: the short version, in the order you'll use it.
- The Holdback guide: every screen, every setting and every button. Also as a PDF.
- Avoiding chargebacks, VAT and deposits.
- Email support@holdback.co.uk. We aim to reply within one working day, UK time.